Project Goliath (2/3) - Procurement
Assembling the Titans - The Component Hunt
The plan was written. The requirements were locked. Now came the part I had been anticipating with equal measures of excitement and dread: actually finding the parts. This wasn’t a shopping list I could take to Best Buy. You can’t walk into a Micro Center and ask the retail associate to point you toward the retired Supermicro server boards or the aisle of off-lease enterprise SAS drives. No, this was going to be a hunt. Weeks of eBay stalking, Reddit threads, price tracking spreadsheets, and the occasional late-night “Buy It Now” impulse that I’d immediately second-guess.
I wasn’t just looking for any parts. I was chasing the specific intersection of enterprise-grade performance and homelab-friendly pricing — the sweet spot where data center depreciation becomes my gain. Every component had to meet the requirements from the plan. Every price had to make me smile. And every purchase had to come with a story worth telling.
Here’s how the hunt went down.
Core Components
The Motherboard
The Requirement: A rock-solid foundation with a single CPU socket for low electricity consumption, at least 6 DIMM slots for a sea of RAM, and a healthy number of PCIe lanes for storage controllers.
The Lore & Research: To run a modern server CPU, you need a motherboard from its era. My target was the Intel Xeon “Cascade Lake” generation, which meant I was diving into the world of Supermicro’s X11 platform. Supermicro strategically launched this generation back in July 2017 to coincide with Intel’s revolutionary Xeon Scalable processors. This wasn’t just an incremental update; it was a new era of server computing built around the C622 chipset, designed from the ground up to handle high core counts and massive memory bandwidth. Finding an X11 board means you’re getting a platform that was at the forefront of data center technology.
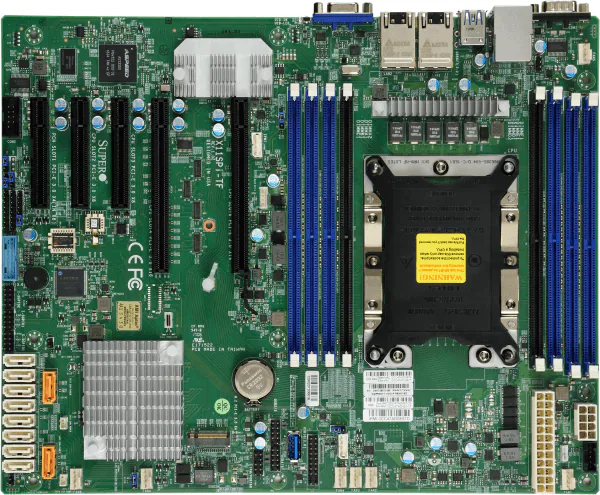
The Final Choice & Why: After weeks of eBay-watching, I snagged a Supermicro X11SPI-TF for $200. It’s a masterpiece of server engineering: 8 DIMM slots for up to 2TB of RAM (yes, terabytes), two full-speed x16 PCIe slots, and Supermicro’s legendary IPMI for remote “lights-out” management. It was the perfect intersection of immense capability and homelab-friendly price.
The CPU
The Requirement: A CPU with enough cores and clock speed to effortlessly handle ZFS’s demands: compression, deduplication (if I ever get that crazy), and scrubbing multi-terabyte pools without breaking a sweat. My target was a Passmark score north of 20,000.
The Lore & Research: The Xeon Scalable family was a big deal. It replaced the old E5/E7 naming with a metallic tier system: Bronze, Silver, Gold, and Platinum. These chips introduced Intel’s “mesh architecture,” a new way for the cores to talk to each other, which was a significant leap in performance. Not only were these CPUs impressive, but there were a ton of them. There are 98 distinct CPU choices in Xeon Scalable that I could have gone with.
Among the 98 there are bound to be a lot of “winners” and “losers” for my system. The lamest choice would be the Xeon Bronze 3104. 1st generation, 6 core, 1.7 GHz clockspeed, no Turbo Frequency, and a Passmark Multithread Rating of 4,392! Like putting a lawnmower engine in a sports car. Its performance is completely outclassed by modern consumer-grade CPUs. The coolest choice would be the Xeon Platinum 8280. 2nd generation, 28 cores, 2.7 GHz clockspeed with a 4.0 GHz boost, and a Passmark Multithread Rating of 35,434. Ultimate bragging rights.
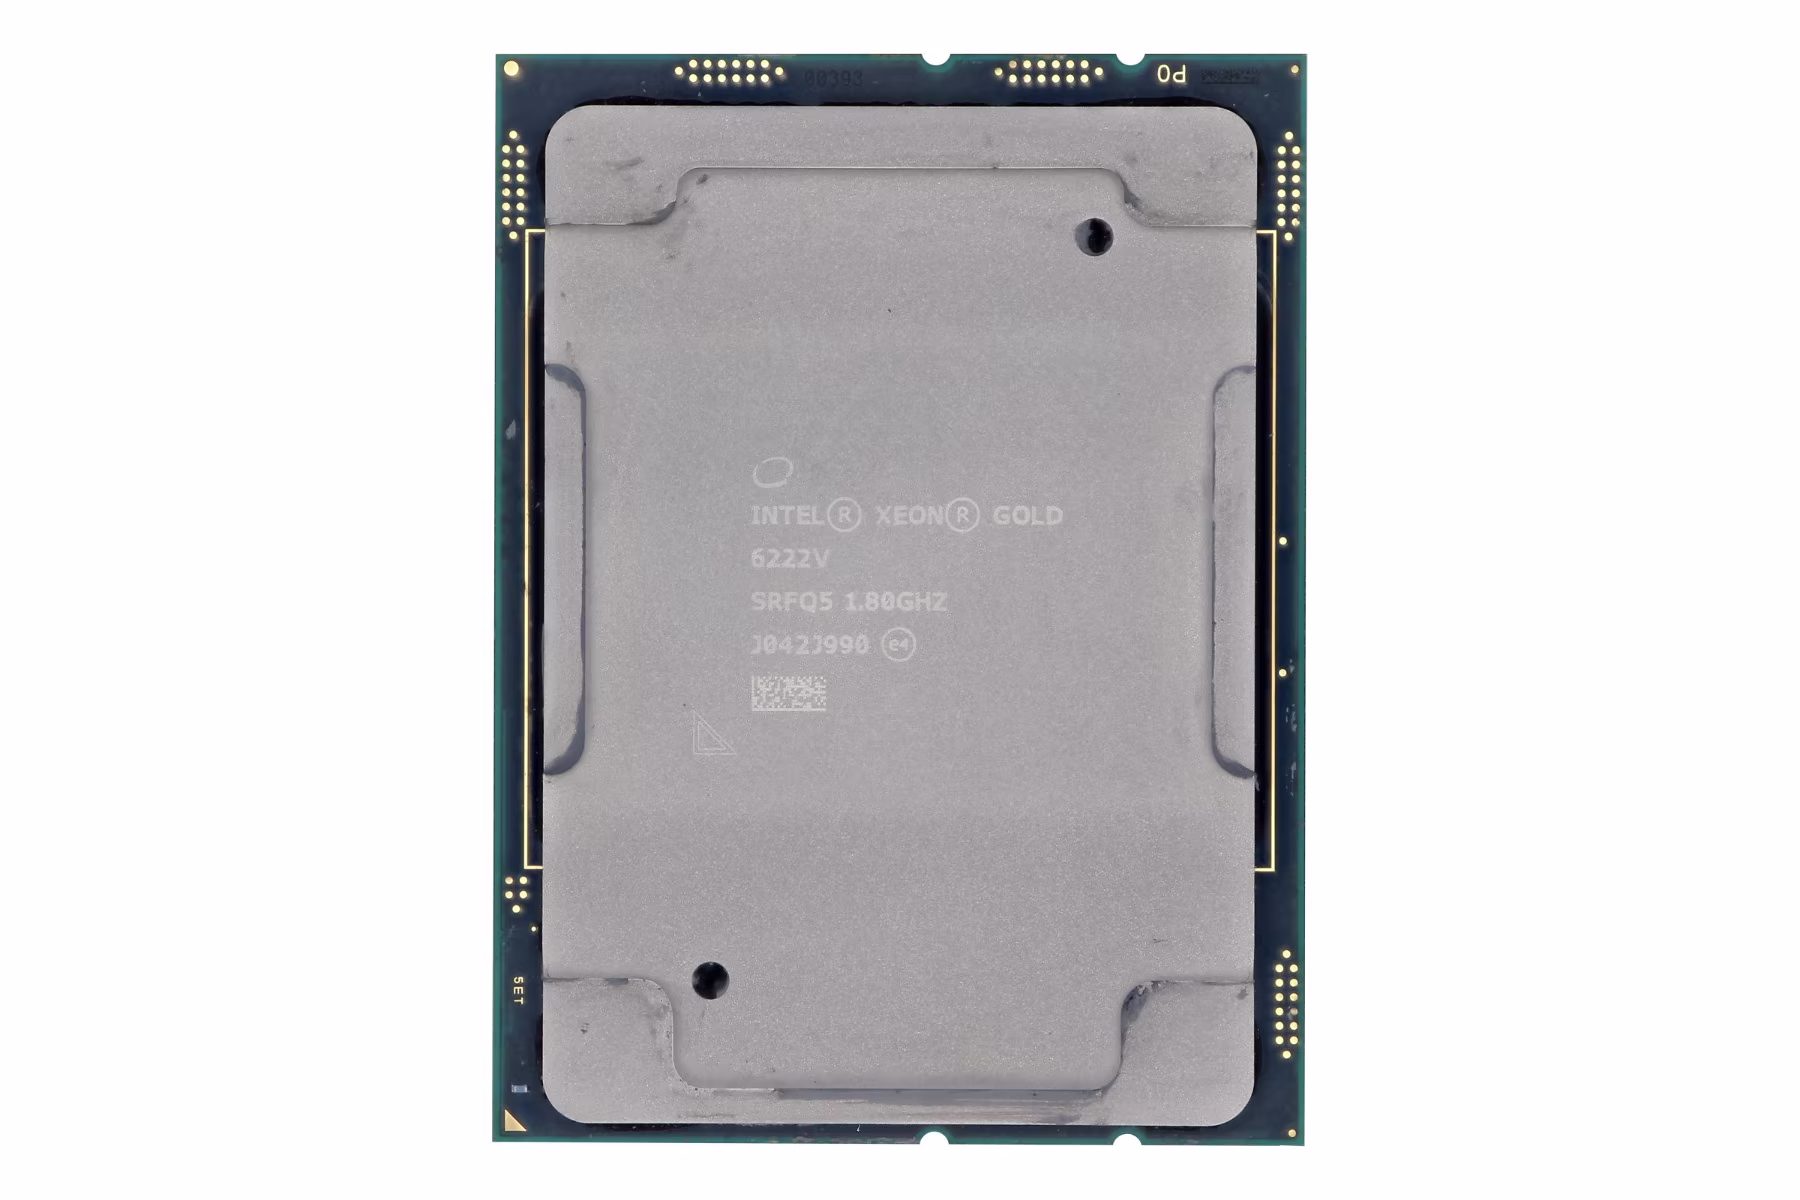
The Final Choice & Why: The winner was an Intel Xeon Gold 6222V I found for an unbelievable $55. Its specs are perfect: 20 cores, 40 threads, and a Passmark score of 24,254 (equivalent to 28 Raspberry Pi 5s). For that price, I’m getting performance that would have been unthinkable for a home user when it was released. It’s the ultimate example of the “enterprise heart, homelab budget” philosophy.
Technical details:
- Cores / Threads: 20 Cores / 40 Threads
- Base Clock Speed: 1.8 GHz
- Max Turbo Frequency: 3.6 GHz
- Cache: 27.5 MB
- TDP: 115W
- Passmark Multithread Rating of 24,254 (equivalent to 28 Raspberry Pi 5s)
- Supports 1 TB of RAM
- Max 6 Memory Channels
- Max 48 PCI Express Lanes
Of all the chips forged for the ‘Cascade Lake’ generation of servers, few have a more specialized and intriguing tale than the Intel Xeon Gold 6222V. It’s not a processor of brute force like its higher-cored brethren, nor is it a simple entry-level chip. The lore of the 6222V is one of high-frequency density, a specialized tool crafted for a very specific digital domain. The key to its story lies in its “V” suffix.
No, it’s not “V” for Vendetta. In the lexicon of Intel’s 2nd Generation Xeon Scalable family, “V” stands for Virtualization-Optimized. This processor was specifically engineered to address a growing challenge in data centers and cloud environments: the need to support a high number of virtual machines (VMs) per server without sacrificing the clock speed that many applications crave. While other Xeon processors might boast higher core counts, they often do so at the cost of lower clock speeds. The Gold 6222V flips that script. Its lore is not about having the most cores, but about having an abundance of fast cores. The unsung hero of the responsive cloud. It’s the processor chosen not by those who need to crunch the largest datasets in one go, but by those who need to provide the fastest, most consistent service to the largest number of individual users or processes.
Memory and Storage: The Core of a NAS
RAM
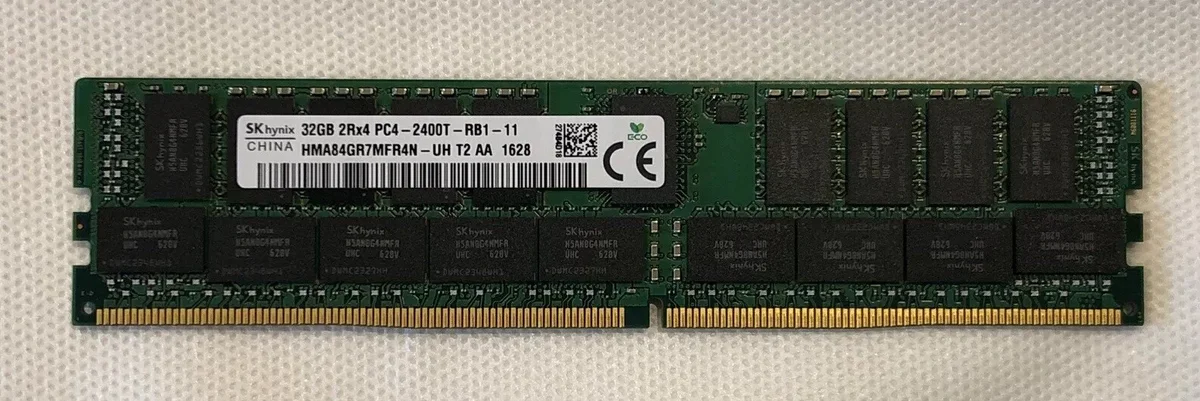
The Requirement: ZFS is famously memory-hungry, and for good reason. It uses RAM to create an incredibly fast read cache called the ARC (Adaptive Replacement Cache). Somewhat following the golden rule of thumb—“1GB of RAM for every 1TB of storage”—my goal was a minimum of 128GB of DDR4 ECC RAM. Crucially, it had to be Registered DIMMs (RDIMMs) to be compatible with the Xeon server platform, and I needed a solution that left a clear and easy path for future expansion.
The Lore & Research: To understand why ECC RAM is so critical, we have to go back to the dawn of computing. In the early days, engineers faced an invisible enemy: cosmic rays. High-energy particles from space constantly bombard the Earth, and when one strikes a memory chip, it can spontaneously flip a single bit of data from a 0 to a 1. This is not a theoretical problem; it’s a constant, physical phenomenon.
So why isn’t this technology in every computer? Cost. In the race to make home PCs affordable in the 80s and 90s, manufacturers cut the extra memory chips required for ECC. They made a calculated decision that for a home user, an occasional crash or corrupt operating system was an acceptable annoyance.
For the server world, where data integrity is absolute, that was never an option. ECC became the dividing line between consumer grade best effort hardware and enterprise grade mission-critical hardware. By choosing ECC RAM for this build, I’m not just buying old parts; I’m leveraging decades-long engineering efforts built for the sole purpose of protecting data.
Side note: I don’t know why so many users, especially those on Reddit, forgo ECC RAM. While not every one of my files is mission critical, it’s a small investment for peace of mind. Bit rot WILL eventually happen to systems that lack systems to prevent it. Hell, it happened on my gaming PC while I was constructing this NAS. Not only did it happen, it affected the operating system which forced me to reinstall Windows.
The Final Choice & Why: I ultimately purchased four 32GB sticks of SK Hynix DDR4 2400MHz ECC RDIMM for a grand total of $108. At just $27 per stick, this is an unbelievable value proposition. To put it in perspective, a single new 32GB stick of consumer-grade (non-ECC) RAM can often cost more than this entire 128GB kit. This is also the highest speed ram that I can run with this CPU.
Boot Drive
The Requirement: The boot drive has a straightforward but critical job: hold the TrueNAS Scale operating system and load it quickly. It doesn’t need to be huge; 256GB to 512GB is more than enough. It also doesn’t need the extreme write endurance of a data drive. The primary requirements for me are speed and simplicity, all without wasting a precious hot-swap bay that could be used for the main storage pool.
The Lore & Research: In the not-so-distant past, server boot drives were a clumsy affair. You’d often have to sacrifice one or two of your main drive bays for a pair of mirrored hard drives or SATA SSDs, complete with a mess of extra cables. The arrival of the M.2 form factor changed everything.
These tiny “sticks of gum” plug directly into the motherboard, eliminating cables and freeing up all the main drive bays for what they do best: storing data. They operate on the NVMe protocol, communicating directly with the CPU over PCIe lanes, making them exponentially faster than the older SATA standard.
This led to a key question: Do you need a pricey “enterprise” NVMe for a boot drive? For the main ZFS data pool, absolutely. But for the boot drive, the workload is very light. After the initial boot-up, the OS doesn’t write to the disk very often. This makes a high-quality consumer NVMe drive one of the best places to save money in a server build. The key to mitigating the risk of using a single, non-enterprise drive is a solid backup plan. TrueNAS makes it incredibly simple to back up your entire system configuration. If the boot drive ever fails, the recovery process is trivial: pop in a new M.2 drive, reinstall TrueNAS, and restore the configuration file. Your data pool will be re-imported, and you’ll be back up and running in minutes.
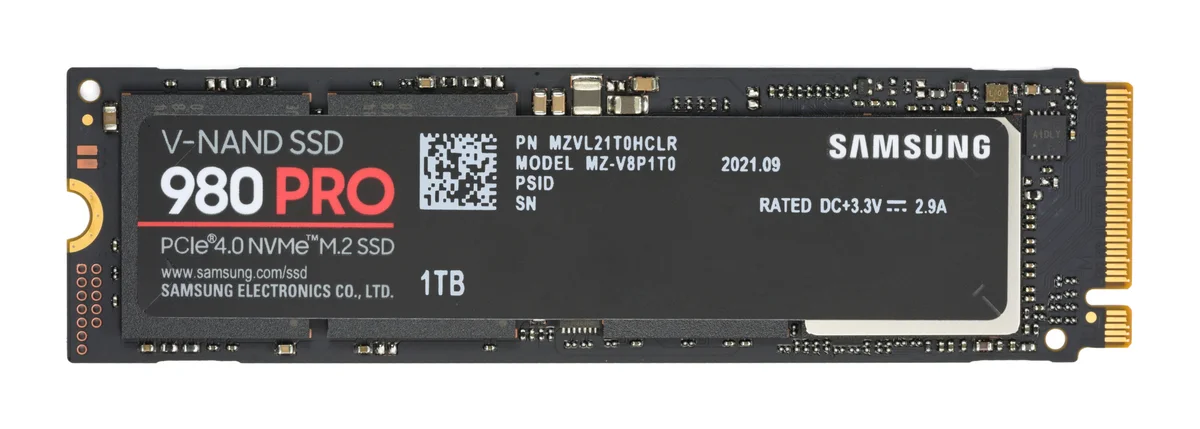
The Final Choice & Why: No need to get fancy here. I am using a 500GB Samsung 980 NVMe SSD that I got for $20 on the TikTok shop awhile ago. This was an easy decision. The Samsung 980 is a reputable, fast, and reliable consumer drive that perfectly fits the bill.
- Cost Effective: You can’t beat $20. This is the “Homelab Budget” philosophy in action.
- More Than Enough: 500GB is ample space for the TrueNAS OS and any future system-level applications, and its NVMe speed ensures the server boots quickly and the web interface is always responsive.
- While it is a single point of failure, the risk is easily managed with regular configuration backups. It’s the perfect, no-nonsense solution for this build’s boot-up duties.
Hard Drives
The Requirement: The goal for the hard drives was simple on the surface: fill the 24 bays with as much storage as possible for the lowest cost per terabyte. This meant finding the absolute sweet spot in the price-per-terabyte curve on the second-hand market. The drives needed to be enterprise-grade, as they are the single most likely failure point in the entire system, and I needed enough of them to build my resilient storage pool.
The Lore & Research: Hard drives are tricky. This is where the “Enterprise Heart, Homelab Budget” philosophy faces its greatest test. Buying 24 brand-new, high-capacity NAS drives could easily cost more than the rest of the server combined. The only viable path is buying used enterprise drives.
This path, however, is paved with a calculated risk. Typically, these are going to be ~5 years old with anywhere from 25,000-50,000 power-on hours. The core of my research was about understanding and mitigating that risk.
First, SAS vs. SATA. While used SATA drives are out there, I chose to exclusively hunt for SAS (Serial Attached SCSI) drives. Why? Because they’re built to a higher standard. SAS drives offer better performance under heavy, concurrent loads and are generally engineered for higher reliability than their SATA counterparts. They are true workhorses, designed to run 24/7 for years on end.
Second, understanding the “high hours.” 50,000 hours sounds terrifying until you do the math (it’s about 5.7 years) and remember what these drives were designed for. Fun fact - one of the most wear intensive things for a hard drive is turning it off and on again. The spin up process puts mechanical stress on the components, exacerbated by the cold internal lubricant that can’t offer a true low friction environment . Hopefully, drives I’m buying have spent their entire lives spinning constantly in a climate controlled data center, the ideal environment for them. High power on hours with a low power cycle count is actually a good sign.
The ultimate safety net, however, is ZFS itself. The plan isn’t to hope drives don’t fail; the plan is to expect them to fail and be completely prepared. By using a RAID-Z2 or RAID-Z3 configuration, the storage pool can survive two or even three simultaneous drive failures without any data loss. This is the reason I built this entire system. My confidence isn’t in any single used drive, but in the resilience of the system as a whole.
The Final Choice & Why: I am starting my pool with a set of eight 10TB enterprise SAS hard drives from various manufacturers.
This decision came down to pure value. After weeks of watching the market, it was clear that 10TB drives are the best terabyte/$ on the second hand market right now. Larger drives like 14TB or 18TB still carry a significant price premium, while smaller drives offer less storage density.
Ideally, these last for a few years before I need to replace them, and they’ll die one at a time, giving me plenty of warning to swap in a replacement. The worst-case scenario is that three fail at the same time, leading to loss of the entire storage pool, but with RAID-Z2 that is incredibly unlikely. I’ll be running extensive “burn-in” tests on all drives before they get put into service to weed out any that are close to failure.
It’s a game of statistics, but one that is heavily weighted in my favor. For once, I am the house!
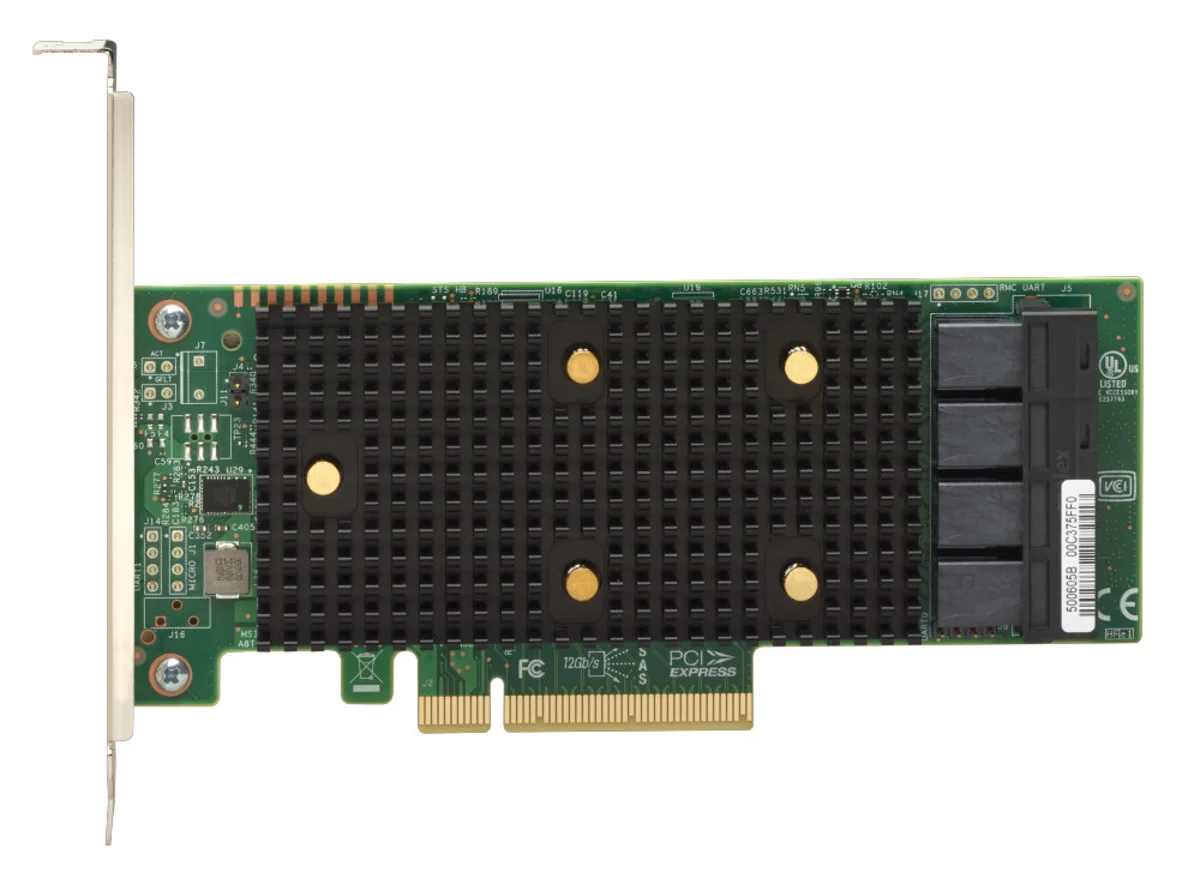
Host Bus Adapter (HBA)
The Requirement: ZFS demands to speak directly to the hard drives. It manages all the redundancy and data integrity itself, so any hardware RAID controller is not just unnecessary, it’s a problem. I needed an HBA (Host Bus Adapter) with at least 16 internal ports, flashed to the classic “IT Mode.”
The Lore & Research: In the world of storage, one name reigns supreme: LSI (now owned by Broadcom). Their controllers are the industry standard. “IT Mode” (Initiator Target) is a special firmware that turns a potentially complex RAID card into a simple, “dumb” adapter that just passes the drives straight through to the OS. This mode became so popular with the rise of software-defined storage like ZFS that it’s now a must-have feature for any serious build. The homelabber’s pro-tip is to look for cards rebranded by major OEMs like Dell or Lenovo—they’re the exact same LSI hardware, often at a lower price.
The Final Choice & Why: I went with a Lenovo 430-16i HBA for $78.85. It’s a modern 12Gb/s SAS-3 card with four SFF-8643 ports, giving me an initial 16 lanes I need to connect 16/24 bays on the backplane. It came pre-flashed to IT Mode, saving me a headache and getting me one step closer to nirvana.
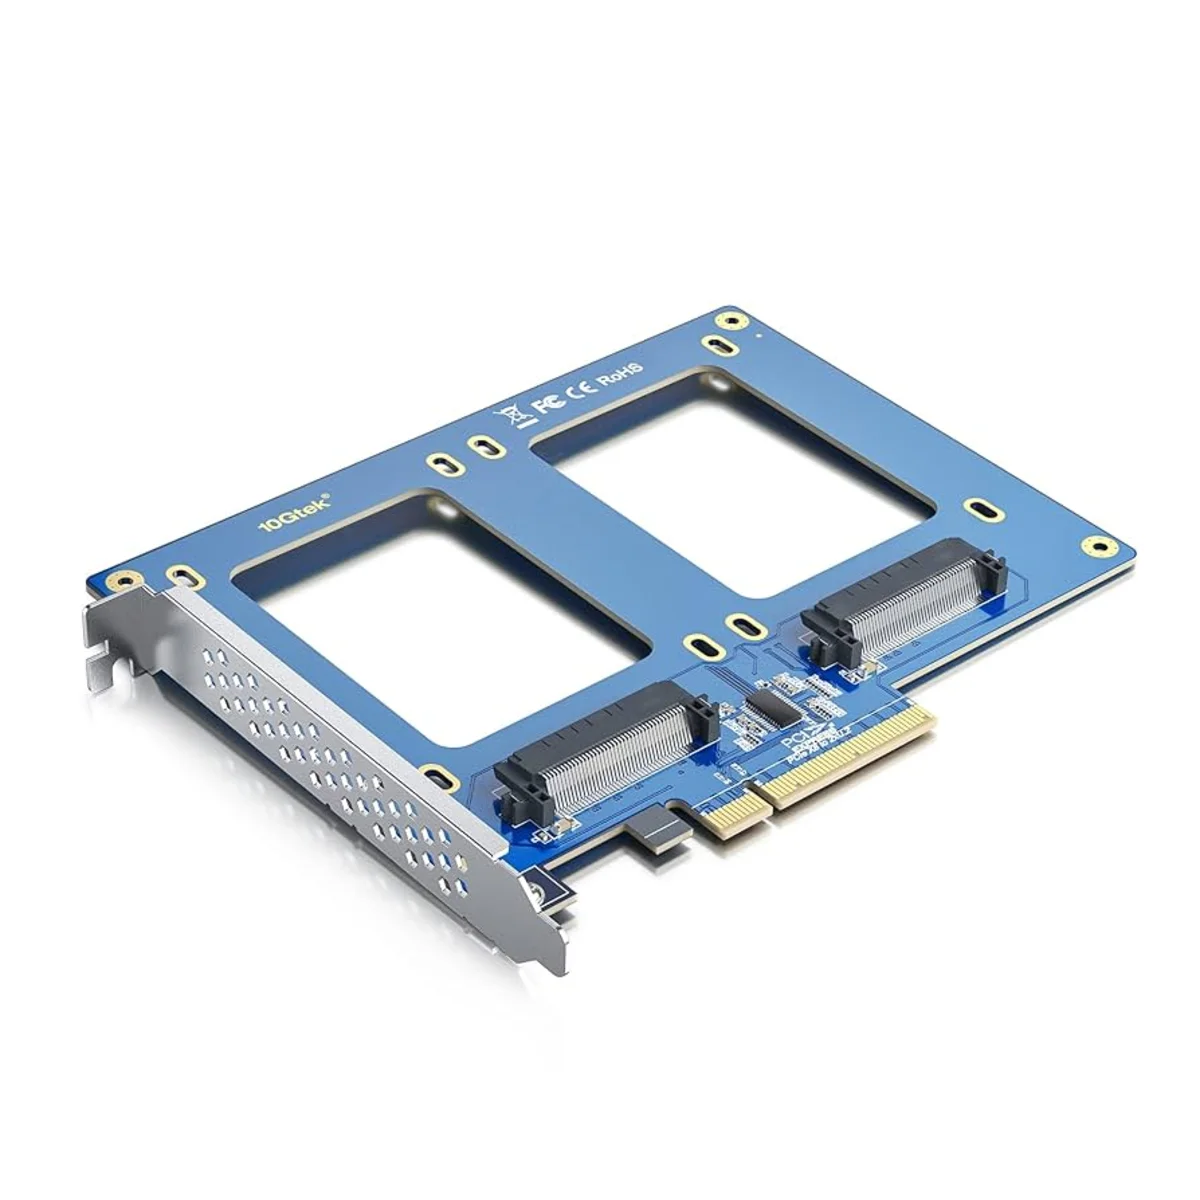
Special VDEV SSDs
The Requirement: The main pool of hard drives is great for storing and streaming large files, but it’s terrible at handling thousands of tiny, random requests at once. This is a weakness expressed as IOPS (Input/Output Operations Per Second). My goal was to dramatically increase the pool’s IOPS performance to solve a major issue with my old NAS: library scans killing movie streams. The solution had to be fast, reliable, and above all, redundant. A Special VDEV is a critical part of the pool, so if it fails, the entire pool fails. Therefore, a mirrored pair of SSDs was a non-negotiable requirement.
The Lore & Research: This is going to be the most unique thing about my build, the inclusion of a special VDEV comprised of SSDs. ZFS is a complicated system, but also very elegant as it allows for these very beneficial tools. Let me give you a refresher…
Imagine your big server full of hard drives is like a giant library with thousands of books. When you want to find a specific picture or movie, your server has to run around the huge library to find the right book (your file). This can be slow as hard drives are bound to their rotational speed and seek slowly. A Special VDEV is like giving your server a small, super fast “cheat sheet.” Instead of storing the whole book on the cheat sheet, it only stores two things:
- Where every book is located (this is called metadata).
- The first few words of every book (these are your small files, like poster art).
Now, when you ask for a file, the server first looks at its tiny, lightning fast cheat sheet. It instantly knows where to go and can even show you a preview right away. It only goes into the big, slow library when you need the whole book. For your server, this means things like loading your movie library will feel instant, because all those little pictures and file locations are on the fast SSDs instead of the slower hard drives.
Why am I using this? One of the issues with my original NAS is that when I am trying to stream a movie, often I would get interrupted by a service trying to scan my entire pool. This consumes all of the IOPS of the pool of HDDs and turns my stream into a dribble. The scan forces the hard drives to do what they are worst at, seeking all over the platters for thousands of tiny files. A process bound to the native rotational speed of the heads. By moving that entire workload to SSDs, the hard drives are left free to do what they do best, which is delivering a large movie file in one continuous stream.
The Final Choice & Why: Ultimately, I chose a mirrored pair of 2TB Intel DC P3600 U.2 SSDs, connected via a 10GTEK PCIe to Dual U.2 Adapter.
This was a very specific choice for a few key reasons. First, these are enterprise U.2 drives, not consumer M.2 drives. This gives them two huge advantages: insane endurance and, most importantly, power loss protection. Onboard capacitors ensure that if the power cuts out, the drive has enough energy to finish writing its data. This is critical for a VDEV that holds all the metadata for the entire pool.
Second, they are in a mirror. If one of the SSDs fails, the entire system continues to run perfectly on the other one. I can replace the failed drive and “resilver” the VDEV with zero downtime or data loss.
Finally, the value is incredible. These drives were thousands of dollars when new, but on the second hand market they are affordable. Getting this level of enterprise grade performance and reliability for a total of $190 for the pair is a huge win, and it will permanently solve the single biggest performance bottleneck I had with my old server.
 |  |
|---|
The Supporting Cast: Case, Power, and Cooling
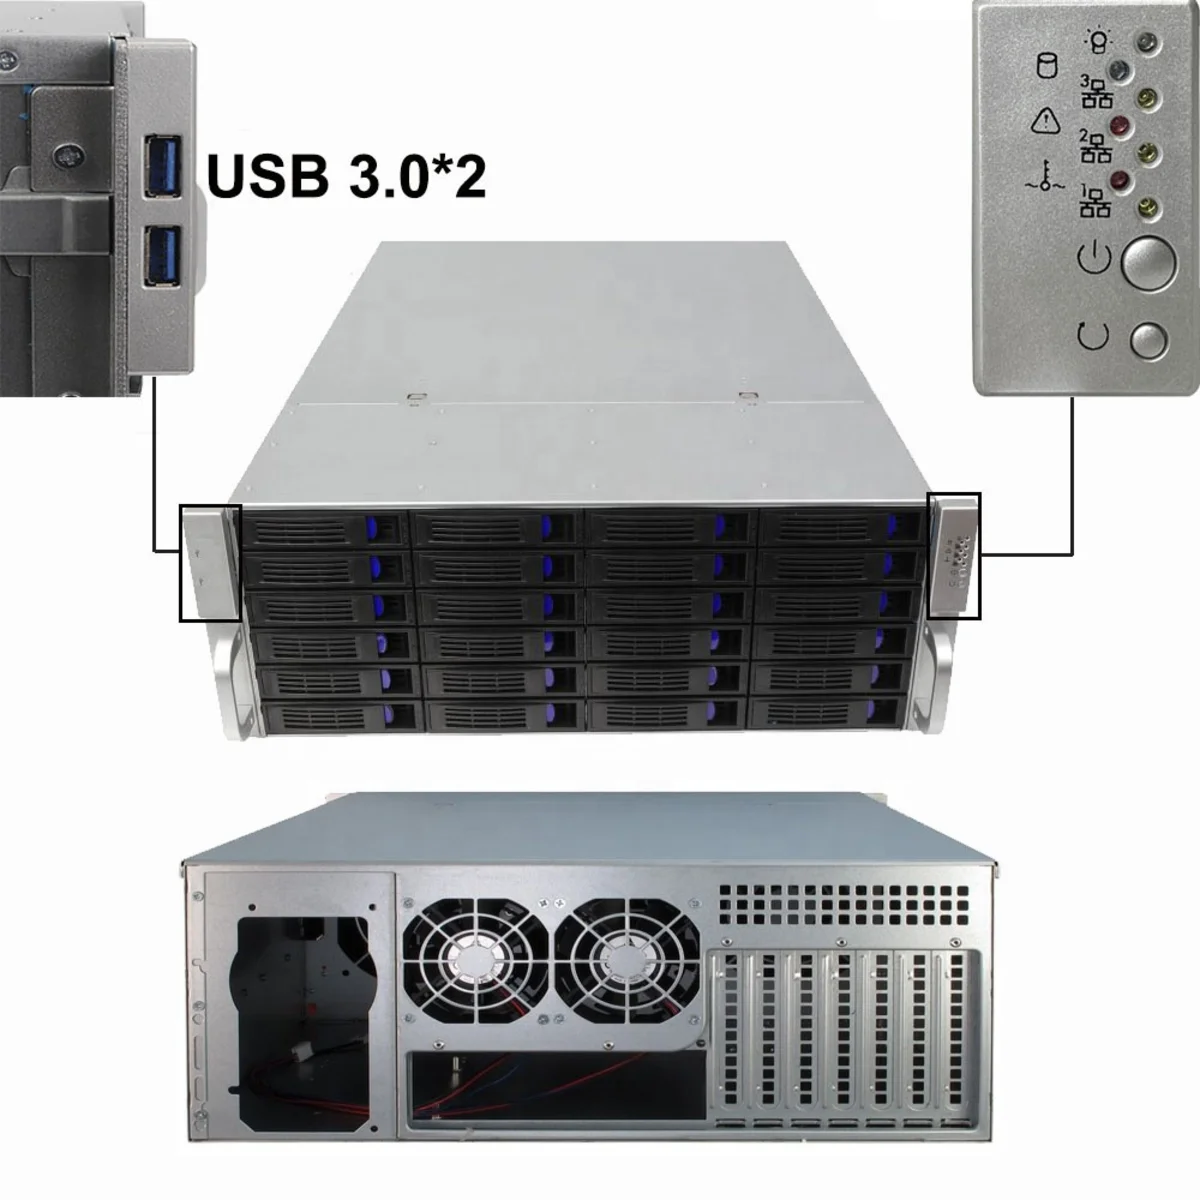
The Case
The Requirement: The case is the foundation of the entire build, and the requirements were strict. First, it needed to hold 24 hot-swappable 3.5 inch hard drives. This capacity is the cornerstone of the “Foundation for the Future” philosophy. Second, it had to be a 4U rackmount form factor to fit into a standard server rack. A 4U height provides plenty of room for airflow and compatibility with standard components like the E-ATX motherboard I chose. Hot-swap capability was non-negotiable, as it’s essential for replacing failed drives without server downtime.
The Lore & Research: Finding a good, affordable 24 bay case is surprisingly difficult. The big names in the server world, like Supermicro or Chenbro, make fantastic chassis that are built like tanks. They are also incredibly expensive, often costing over a thousand dollars for just the empty case. Even on the used market, they hold their value well and can be hard to find in good condition.
This high cost forces you to look for alternatives. My research led me down the rabbit hole of direct from factory suppliers on sites like Alibaba. This can feel like a gamble. You are sending a not insignificant amount of money overseas for a large, heavy product with no guaranteed return policy. The key to navigating this is some good old Reddit sentiment analysis. I found a handful of other homelabbers who had taken a chance on a specific company. They posted detailed reviews, pictures, and their overall impressions. They were the pioneers who made my purchase much less of a blind risk. Thanks guinea pigs.
The Final Choice & Why: For this build I went with a custom case from a supplier in China. The Shenzhen Shangzhixinke Technology Limited company’s model NP-S424650. A few people on Reddit took a chance on this company and said that it was a quality product.
This case met all my requirements for a fraction of the cost of a name brand alternative, coming in at $406. It has 24 hot-swap bays, a SAS/SATA backplane, and a spacious interior that easily fit all my components.
Overall I am pretty pleased. The factory was quick to respond, offered me pictures of it being completed in the warehouse, and shipped it within a day of payment. It took a few weeks to get here via sea transport, but was packed pretty well and wasn’t damaged during the journey. The gamble paid off, and it proves that with a little bit of community backed research, you can get incredible value by looking beyond the usual options.
Cooling
Case Fans: Brute Force vs. Refined Engineering
The Requirement: The cooling requirements for this case are no joke. The fans have one primary, brutal job: to pull a massive amount of air through a dense wall of 24 spinning hard drives. This isn’t about gentle, quiet airflow. This requires high static pressure, which is a fan’s ability to push air through resistance. The goal was to find a solution that could keep all 24 drives well within their safe operating temperatures, even under heavy load.
The Lore & Research: When it comes to fans, the homelab community generally worships at the altar of one brand: Noctua. They are the undisputed champions of quiet, efficient, and brilliantly engineered fans. A fan like their industrial NF-F12 is a beast of static pressure, designed for radiators and heatsinks. It’s also famous for its whisper quiet operation at lower speeds and its signature (or infamous) beige and brown color scheme.
The problem? Noctua fans are expensive. To replace the three main 120mm fans in my case would cost nearly $100.
The alternative was to see what the “free” fans that came with the case could do. I kept the fans that came with the case. They are an unknown manufacturer, but they are pretty high powered. The label does give some information. P/N DC1203812BH, 12V, 1.5A. Fans with a similar electrical rating provide a massive 178 CFM of airflow and a very high static pressure, but at a staggering 54 dB/A sound level.
This creates a clear choice. On one hand, the Noctua: quiet, efficient, and expensive. On the other hand, the stock fans: a brute force solution that is incredibly powerful, incredibly loud, and best of all, free. A 54 decibel noise level is not by any means quiet; it’s the sound of a loud conversation or a running dishwasher. But for a server that will live in a rack in a closed room, noise is a much lower priority than cooling performance and budget.
The Final Choice & Why: For now, I’m sticking with the stock fans.
This decision is purely practical. These fans are designed for exactly this kind of server environment where airflow is everything and noise is an afterthought. They are more than capable of keeping the hard drives cool. While they sound like a jet engine preparing for takeoff, they will live in a part of the house where that simply doesn’t matter.
This choice saves me a hundred dollars that can be better spent elsewhere. If I ever move the server into a more noise sensitive area, swapping in a set of Noctuas is an easy 15 minute upgrade. But for now, the free, brute force solution is the right tool for the job.
Let’s put the numbers side by side:
- Stock Server Fan:
- Airflow: ~178 CFM
- Static Pressure: ~0.94 InAQ
- Noise: ~54 dB/A (Sounds like a running dishwasher or loud conversation)
- Cost: $0 (Included with case)
- Noctua NF-F12 industrial PPC-3000:
- Airflow: 110 CFM
- Static Pressure: 0.30 InAQ
- Noise: ~43.5 dB/A (Sounds like a quiet office or library)
- Cost: ~$30 per fan
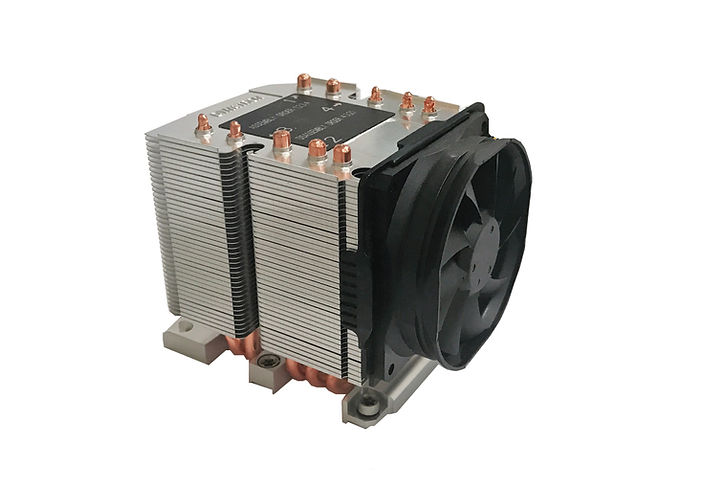
CPU Cooler
The Requirement: With the CPU secured, it needed to be kept cool. The challenge here was physical: I only had ~163mm of vertical clearance to work with inside the 4U chassis. Most consumer CPU coolers, especially the beefy tower-style ones, are too tall. The cooler needed to be low-profile, compatible with the LGA 3647 socket, and capable of dissipating the 115W TDP of the Xeon Gold 6222V. And since the case fans already sound like a jet engine, a few extra decibels from the CPU cooler wasn’t going to make or break anything.
The Lore & Research: Rackmount server cooling is a different world from consumer PC cooling. You can’t just slap a Noctua tower cooler in a 4U case and call it a day. The space constraints are real and unforgiving. This is where specialized server cooler manufacturers come in, and one name stands above the rest in this niche: Dynatron.
Dynatron makes coolers specifically categorized by rack unit height — 1U, 2U, 3U, and so on. Each step up in size gives you more airflow and a larger heatsink, but eats into your precious vertical clearance. I was limited to a 3U cooler, as 4U was too tall for the case and 2U might not provide enough airflow for a 115W TDP processor. Given the brand, the size constraint, and socket compatibility, the field narrowed to exactly one option.
The Final Choice & Why: The Dynatron B11, at $60. My wallet was a bit hurt, but it was a solid choice.
Some specs:
- Fan speeds:
- At Duty Cycle 20%: 1,300 ± 200 RPM
- At Duty Cycle 50%: 2,300 ± 10% RPM
- At Duty Cycle 100%: 4,000 ± 10% RPM
- Airflow: 50 CFM at 100% speed
- Static Pressure: 7.8mm-H2O at 100% speed
- Noise: ~42.2 dB/A at 100% speed
Not the most exciting component in the build, but a necessary one. When your CPU is doing the heavy lifting of ZFS compression and checksums, you want to know it’s not going to cook itself. The B11 gets the job done without any drama.
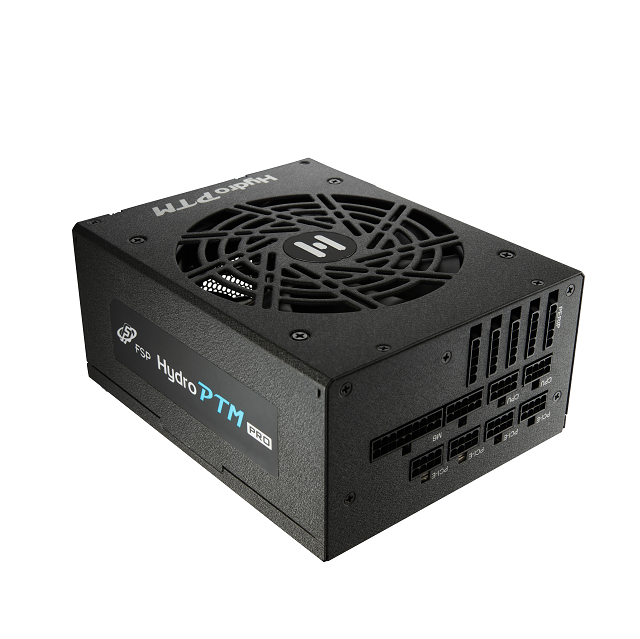
Power Supply
The Requirement: The power supply had to do more than just deliver enough wattage. It needed to safely power 24 hot-swappable 3.5 inch hard drives, each pulling significant current during spin-up. The real challenge wasn’t total wattage — it was having enough peripheral power connectors to distribute that load without melting anything. Each row of 4 drives on my backplane has its own Molex connector, meaning I needed ideally 6 dedicated peripheral ports. That is a tall order.
The Lore & Research: This is one of those areas where the stakes are literal. Let’s do the math. 24 hard drives spinning up simultaneously can pull around 48 amps on the 12V rail. If you try to funnel that through a single peripheral cable, you’re asking for trouble. We’re talking about enough current to melt a molded Molex connector. Potentially cause a fire. This isn’t fear mongering; it’s electrical physics.
A single peripheral cable on most power supplies provides about 5 amps on the 12V rail. That’s nowhere near enough for a row of 4 drives spinning up at once. The solution is straightforward in theory: spread the load across multiple cables, each serving its own row of drives. In practice, this means finding a power supply with an unusually high number of peripheral ports.
Here’s the problem: virtually no consumer power supply comes with 6 peripheral ports. Even high-wattage units designed for gaming rigs with multiple graphics cards typically top out at 4. The peripheral port count is a spec that nobody except server builders ever looks at, and it became the single most important number on my power supply spec sheet.
The Final Choice & Why: I settled on an FSP Hydro PTM Pro 850W. It provides 5 peripheral slots — just one short of my ideal 6. That’s enough for 2 backplanes per slot with 2 extras for fans and other peripherals. It’s a practical compromise. I’ll just need to be mindful of load balancing across the cables to make sure no single line is carrying more than its share.
Was this the most glamorous component hunt? No. But when you’re building a machine that draws this much power and holds this much data, respecting the electrical engineering isn’t optional. The power supply may not be sexy, but it’s the component that keeps everything else alive.
Summary
The Tally
| Component | Details | Cost |
|---|---|---|
| Motherboard | Supermicro X11SPI-TF | $200.00 |
| CPU | Intel Xeon Gold 6222V (20-core) | $55.00 |
| RAM | 4x 32GB SK Hynix DDR4 ECC RDIMM (128GB) | $108.00 |
| Boot Drive | Samsung 980 500GB NVMe | $20.00 |
| Hard Drives | 8x 10TB Enterprise SAS (~$110/ea) | $880.00 |
| HBA | Lenovo 430-16i (IT Mode) | $78.85 |
| Special VDEV SSDs | 2x Intel DC P3600 U.2 2TB (mirrored) | $190.00 |
| U.2 Adapter | 10GTEK PCIe to Dual U.2 | $20.00 |
| Case | NP-S424650 24-bay 4U | $406.00 |
| CPU Cooler | Dynatron B11 | $60.00 |
| Power Supply | FSP Hydro PTM Pro 850W | $139.99 |
| Total | $2,157.84 |
If you had told me a year ago that I could assemble a server with a 20-core Xeon processor, 128GB of ECC RAM, 24 hot-swap drive bays, and a mirrored pair of enterprise U.2 SSDs — all for less than the price of a new gaming laptop — I would have asked what you were smoking. Yet here we are.
Every single component in this build tells the same story: the enterprise hardware market is an absolute goldmine for the patient and the informed. A CPU that once commanded four figures, now $55. A motherboard that was the backbone of data centers, now $200. 128GB of server-grade ECC RAM for less than a single new consumer stick. The “Enterprise Heart, Homelab Budget” philosophy didn’t just guide this build — it made it possible.
But a pile of parts is not a server. Right now, scattered across my desk, is a graveyard of retired data center hardware waiting to be resurrected. A Supermicro board hungry for its CPU. A 4U chassis with 24 empty bays staring back at me. Two Intel U.2 SSDs that have no idea what’s about to be asked of them. And a power supply that, honestly, I’m a little nervous about.
The blueprint is done. The components are acquired. The only thing left is the terrifying part: plugging it all in and pressing the power button.
Join me in the final post, where Project Goliath goes from a collection of eBay victories to a living, breathing machine. We’ll cover the build, the cable management, and the moment of truth — the first boot. Let’s hope the smoke stays inside the chips.